Upgrade from OData API to SCIM – IAS for the Onboarding Module > 2of4
This requirement usually happen when you need to enable the IAS as the authentication method for the Onboardees. Then you realized that your IAS Source System communicated with Odata api (API 1) and you need to migrate to SCIM (API 2)
Step by Step
- The first step is to setup mTLS (mutual Transport Layer Security):
At IAS > go to “Identity Provisioning” > from the list of source systems, select the desired SAP SuccessFactors tenant record. - Click on the Outbound Certificate tab
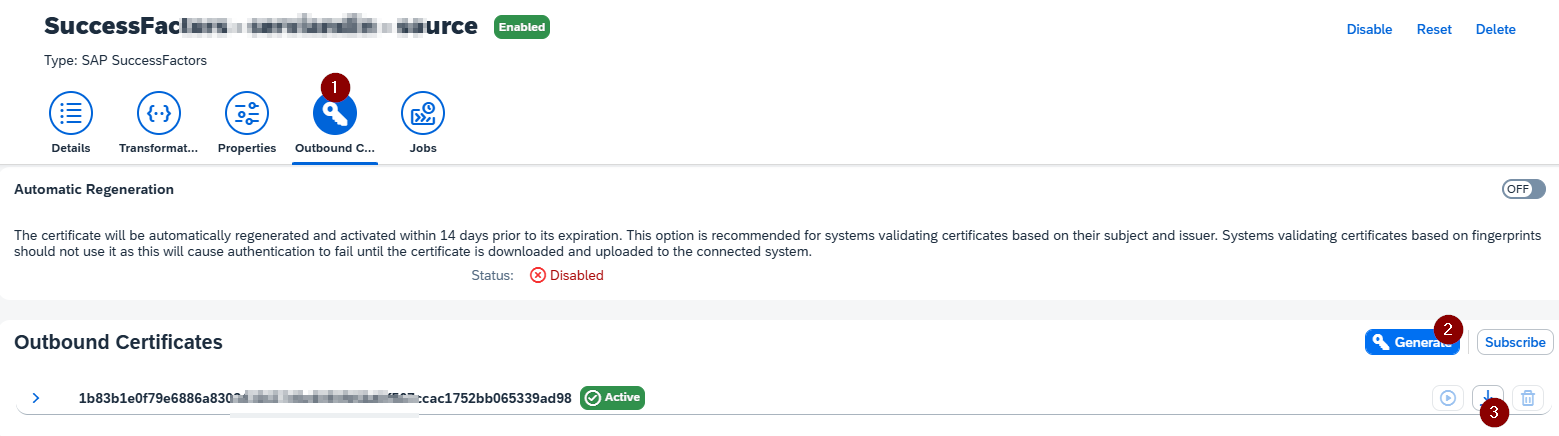
- Once you have this certificate downloaded.
Go to SuccessFactors > Security Center >X509 Public Certificate Mapping > Add > upload the certificate created above.
Make sure you select ‘Identity Provisioning Service’ in the ‘Integration Name’ field and the login name of your admin user in the ‘Login Name’ field.
I used IPSADMIN as Login Name, which was used in the version 1 for IPS job.
- Go back to your SFSF source System > Properties tab to configure the property parameters > and set as below:
Refer to the table below for a list of the properties:
a. Change the “sf.api.version” in Source system > Properties > from 1 to 2.
b. Filed URL: Refer to List of SAP SuccessFactors API Servers under the mTLS Certificate Server column.
c. Change the “sf.user.filter” to active eq “true”
d. Change the “Authentication” to ClientCertificateAuthentication
sdfsdfv
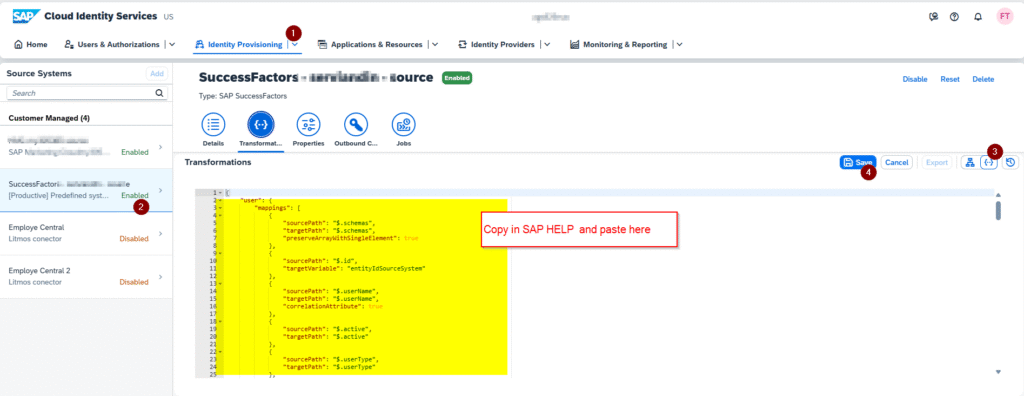
- At this step we are going to change the source and target system transformations.
Run the “Read Job ” and the system should connect as usual.
Until now, the IAS was connected to SFSF though the Odata API, and the access to that data was handled through the “transformations”. By changing to SCIM the API verrsion is not the same.
Tha’s why it’s requiered to access to the source and targe system transformations and change all the JSON code.
Do This: go to “Identity Provisioning” > “Source System” > “Transformation”. Click on “Switch to JSON editor”. Copy the source system “Code Syntax” from this SAP HELP page and paste in your IAS Source System.
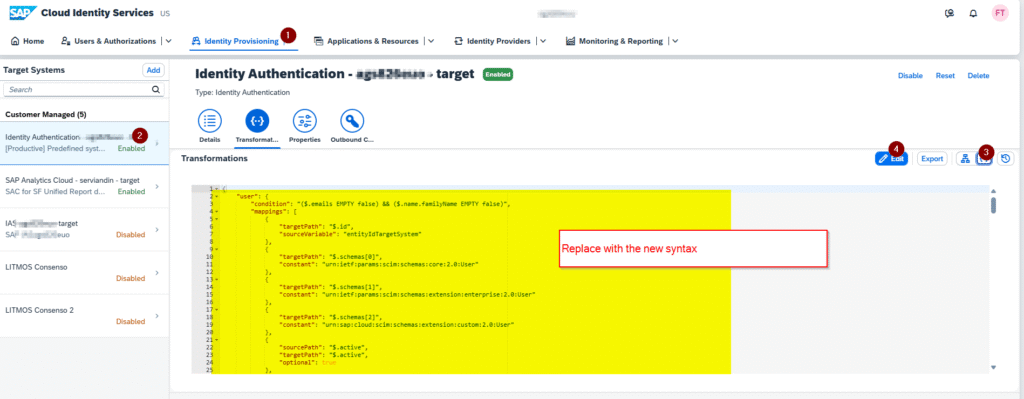
- Do This: go to “Identity Provisioning” > “Target System” > “Transformation”. Click on “Switch to JSON editor”. Copy the source system “Code Syntax” from this SAP HELP page and paste in your IAS Source System.
At this step SAP recommends to reset your source systam and to insert the attribute ips.delete.existedbefore.entities. If you do so all the password will be reset . I’ve implemented without this step and worked perfectly. The entities (users) were uploaded and no more actions were required from my side.

- Go to Identity Provisioning Source Systems Jobs (your SAP SuccessFactors source system) and run a new Read Job. As result you will have all the entities updated as the image above.
This is all for the Odata APi to SCIM migration. VERY IMPORTANT to schedule the new source systems and to disable the old ones.
Next Steps >
3. Enable the Real-Time Sync of New Hires
4. Activate the IAS for Onboardee
Common Issues
statusCode: 400, Response: Value of attribute [applicationId] is invalid.
This is because the migration you are doing is to a very old IAS. You need to update this value sin the target system properties.

- The steps on how such IDs can be collected directly from IAS admin console are below:
- ias.application.id.attribute is the application id taken from IAS admin console. Select your SF application and check the URL in browser where the value can be found. Example of URL: https://<tenant_id>.ondemand.com/admin/#/applications/<application_id>/
- ias.source.system.attribute is 100 for SF, 101 for LMS, 102 for Fieldglass.

[…] Migration from Odata to SCIM […]